Remove duplicates from array


// simple java program to remove
// duplicates

class Main
{
// Function to remove duplicate elements
// This function returns new size of modified
// array.
static int removeDuplicates(int arr[], int n)
{
// Return, if array is empty
// or contains a single element
if (n==0 || n==1)
return n;

int[] temp = new int[n];

// Start traversing elements
int j = 0;
for (int i=0; i<n-1; i++)
// If current element is not equal
// to next element then store that
// current element
if (arr[i] != arr[i+1])
temp[j++] = arr[i];

// Store the last element as whether
// it is unique or repeated, it hasn't
// stored previously
temp[j++] = arr[n-1];

// Modify original array
for (int i=0; i<j; i++)
arr[i] = temp[i];

return j;
}

public static void main (String[] args)
{
int arr[] = {1, 2, 2, 3, 4, 4, 4, 5, 5};
int n = arr.length;

n = removeDuplicates(arr, n);

// Print updated array
for (int i=0; i<n; i++)
System.out.print(arr[i]+" ");
}
}

Prime Number

A prime number is a whole number greater than 1 whose only factors are 1 and itself. A factor is a whole numbers that can be divided evenly into another number. The first few prime numbers are 2, 3, 5, 7, 11, 13, 17, 19, 23 and 29. Numbersthat have more than two factors are called composite numbers.
int n = 15, f=0;

for (int i = 2; i < n; i++)
{
                if (n % i == 0)
                    f = 1;
}

            if (f == 0)
            {
                System.out.println( "Given Number is Prime Number");
            }else{
                System.out.println( "Given Number is Not Prime Number");
            }

Android Lint

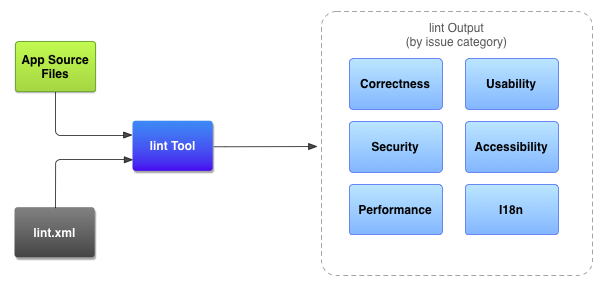
Android Studio provides a code scanning tool called lint that can help you to identify and correct problems with the structural quality of your code without your having to execute the app or write test cases. Each problem detected by the tool is reported with a description message and a severity level, so that you can quickly prioritize the critical improvements that need to be made. Also, you can lower the severity level of a problem to ignore issues that are not relevant to your project, or raise the severity level to highlight specific problems.

The lint tool checks your Android project source files for potential bugs and optimization improvements for correctness, security, performance, usability, accessibility, and internationalization. When using Android Studio, configured lint and IDE inspections run whenever you build your app. However, you can manually run inspections or run lint from the command line.


Longest Palindrome Substring in a String

Longest Palindrome Substring in a String Algorithm

The key point here is that from the mid of any palindrome string if we go to the right and left by 1 place, it’s always the same character.

For example 12321, here mid is 3 and if we keep moving one position on both sides, we get 2 and then 1. We will use the same logic in our java program to find out the longest palindrome.

However, if the palindrome length is even, the mid-size is also even. So we need to make sure in our program that this is also checked. For example, 12333321, here mid is 33 and if we keep moving one position in both sides, we get 3, 2 and 1.


package com.journaldev.util;

public class LongestPalindromeFinder {

public static void main(String[] args) {
System.out.println(longestPalindromeString("1234"));
System.out.println(longestPalindromeString("12321"));
System.out.println(longestPalindromeString("9912321456"));
System.out.println(longestPalindromeString("9912333321456"));
System.out.println(longestPalindromeString("12145445499"));
System.out.println(longestPalindromeString("1223213"));
System.out.println(longestPalindromeString("abb"));
}

static public String intermediatePalindrome(String s, int left, int right) {
if (left > right) return null;
while (left >= 0 && right < s.length()
&& s.charAt(left) == s.charAt(right)) {
left--;
right++;
}
return s.substring(left + 1, right);
}

// O(n^2)
public static String longestPalindromeString(String s) {
if (s == null) return null;
String longest = s.substring(0, 1);
for (int i = 0; i < s.length() - 1; i++) {
//odd cases like 121
String palindrome = intermediatePalindrome(s, i, i);
if (palindrome.length() > longest.length()) {
longest = palindrome;
}
//even cases like 1221
palindrome = intermediatePalindrome(s, i, i + 1);
if (palindrome.length() > longest.length()) {
longest = palindrome;
}
}
return longest;
}

}

Android Device Monitor

Android Device Monitor is a stand-alone tool that provides a graphical user interface for several Android application debugging and analysis tools. The Monitor tool does not require installation of a integrated development environment, such as Eclipse, and encapsulates the following tools:

  1. DDMS
  2. Tracer for OpenGL ES
  3. Hierarchy Viewer
  4. Traceview
  5. Pixel Perfect magnification viewer
Android ships with a debugging tool called the Dalvik Debug Monitor Server (DDMS), which provides port-forwarding services, screen capture on the device, thread and heap information on the device, logcat, process, and radio state information, incoming call and SMS spoofing, location data spoofing, and more.

Traceview is a graphical viewer for execution logs saved by your application. Traceview can help you debug your application and profile its performance.

Hierarchy Viewer allows you to debug and optimize your user interface. It provides a visual representation of the layout's View hierarchy (the Layout View) and a magnified inspector of the display (the Pixel Perfect View).

Traceview
Traceview is a graphical viewer for execution logs saved by your application. Traceview can help you debug your application and profile its performance.

Pixel Perfect magnification viewer

For Android Studio Tools Click Here

Demo Code

/******************************************************************************

*******************************************************************************/

public class Main
{
    void palindrome(String w)
{
    StringBuilder s2 = new StringBuilder(w);
        s2.reverse();
     
        String s = s2.toString();
        System.out.print("The String is "+s+" and is");
       
        if(w.equals(s))
          System.out.println(" a Palindrome");
         else
           System.out.println(" not a Palindrome");
}

int fibonacci (int i){
 
   if(i==0)
        return 0;
   else if(i==1 || i==2)
       return 1;
 
    return fibonacci(i-1)+fibonacci(i-2);
 
}

int factorial (int factorial_number){
 
    if(factorial_number==0)
        return 1;
    else
        return factorial_number*factorial(factorial_number-1);
}

void countFrequency(String str, char ch, int count){
 
    int occ = 0, i;

  // If given count is 0
  // print the given string and return
  if (count == 0) {
   System.out.println(str);
   return;
  }

  // Start traversing the string
  for (i = 0; i < str.length(); i++) {

   // Increment occ if current char is equal
   // to given character
   if (str.charAt(i) == ch)
    occ++;

   // Break the loop if given character has
   // been occurred given no. of times
   if (occ == count)
    break;
  }

  // Print the string after the occurrence
  // of given character given no. of times
  if (i < str.length() - 1)
   System.out.println(str.substring(i + 1));

  // Otherwise string is empty
  else
   System.out.println("Empty string");
 
}

public static void main(String[] args) {
 
    Main demo = new Main();
    demo.palindrome("atata");
 
    int number=5;
    System.out.println("Entered Number is "+number);
    System.out.println("The "+number+"th fibonacci number is: "+demo.fibonacci(number));
 
    System.out.print("Fibonacci Series: ");
    for (int i=0;i<number;i++)
            System.out.print(demo.fibonacci(i)+", ");
     
System.out.println("\nFactorial of "+number+" is "+demo.factorial(number));
 
        //Find Duplicate Items in Array List
    int [] arr = new int [] {1,2,3,4,3,5,6,6,8,9};
    System.out.print("Duplicate elements in given array: ");
    for(int i=0;i<arr.length;i++)
    {
        for(int j=i+1;j<arr.length;j++)
        {
            if(arr[i]==arr[j])
            System.out.print(arr[j]+" ");
        }
    }

    System.out.println(" ");
    demo.countFrequency("geeksforgeeks",'e',3);
 
}
}

Print the string after the specified character has occurred given no. of times

Given a string, a character, and a count, the task is to print the string after the specified character has occurred count number of times.Print “Empty string” in case of any unsatisfying conditions.(Given character is not present, or present but less than given count, or given count completes on last index). If given count is 0, then given character doesn’t matter, just print the whole string.

// Java program for above implementation 

public class GFG 
// Method to print the string 
static void printString(String str, char ch, int count) 
int occ = 0, i; 
// If given count is 0 
// print the given string and return 
if (count == 0) { 
System.out.println(str); 
return; 
// Start traversing the string 
for (i = 0; i < str.length(); i++) { 
// Increment occ if current char is equal 
// to given character 
if (str.charAt(i) == ch) 
occ++; 
// Break the loop if given character has 
// been occurred given no. of times 
if (occ == count) 
break; 
// Print the string after the occurrence 
// of given character given no. of times 
if (i < str.length() - 1) 
System.out.println(str.substring(i + 1)); 
// Otherwise string is empty 
else
System.out.println("Empty string"); 
// Driver Method 
public static void main(String[] args) 
String str = "geeks for geeks"; 
printString(str, 'e', 2); 


Examples:

Input  :  str = "This is demo string" 
          char = i,    
          count = 3
Output :  ng

Input :  str = "geeksforgeeks"
         char = e, 
         count = 2
Output : ksforgeeks

Count frequency of characters in a string

Use a java Map and map a char to an int. You can then iterate over the characters in the string and check if they have been added to the map, if they have, you can then increment its value.

HashMap<Character, Integer> map = new HashMap<Character, Integer>();
String s = "aasjjikkk"; 

for (int i = 0; i < s.length(); i++)
 {
        char c = s.charAt(i);
        Integer val = map.get(c);
       
        if (val != null) { 
                                  map.put(c, new Integer(val + 1));
                                } else { 
                                              map.put(c, 1);
                                            }
                                }
}

Reverse a String

There are many ways of reversing a String in Java for whatever reason you may have. Today, we will look at a few simple ways of reversing a String in Java.

Method 1:
import java.util.Scanner;

public class ReverseString
{
public static void main(String[] args)
{
System.out.println("Enter string to reverse:");

Scanner read = new Scanner(System.in);
String str = read.nextLine();
String reverse = "";

for(int i = str.length() - 1; i >= 0; i--)
{
reverse = reverse + str.charAt(i);
}

System.out.println("Reversed string is:");
System.out.println(reverse);
}
}

Method 2:
import java.util.Scanner;

public class ReverseString
{
public static void main(String[] args)
{
System.out.println("Enter string to reverse:");

Scanner read = new Scanner(System.in);
String str = read.nextLine();

StringBuilder sb = new StringBuilder();

for(int i = str.length() - 1; i >= 0; i--)
{
sb.append(str.charAt(i));
}

System.out.println("Reversed string is:");
System.out.println(sb.toString());
}
}

Method 3:
import java.util.Scanner;

public class ReverseString
{
public static void main(String[] args)
{
System.out.println("Enter string to reverse:");

Scanner read = new Scanner(System.in);
String str = read.nextLine();

StringBuilder sb = new StringBuilder(str);

System.out.println("Reversed string is:");
System.out.println(sb.reverse().toString());
}
}

Print the duplicate elements of an array

In this program, we need to print the duplicate elements present in the array. This can be done through two loops. The first loop will select an element and the second loop will iteration through the array by comparing the selected element with other elements. If a match is found, print the duplicate element.


public class DuplicateElement {
public static void main(String[] args) {

//Initialize example array
int [] arr = new int [] {1, 2, 3, 4, 2, 7, 8, 8, 3};

System.out.println("Duplicate elements in given array: ");

//Searches for duplicate element
for(int i = 0; i < arr.length; i++) {
    for(int j = i + 1; j < arr.length; j++) {
                            if(arr[i] == arr[j])
                             System.out.println(arr[j]);
}}}}

OR

int[] array = {1,1,2,3,4,5,6,7,8,8};

Set<Integer> set = new HashSet<Integer>();

for(int i = 0; i < array.length ; i++)
{
//If same integer is already present then add method will return FALSE
if(set.add(array[i]) == false)
{
          System.out.println("Duplicate element found : " + array[i]);
}

}

Removing white spaces

Method 1:
String s = "This is a sentence";
String s2 = s.trim();


Method 2:
String s = "This is a sentence";
String s2 = s.replaceAll("\\s", "");

Find Factorial of a number

public static int factorial(int number){
//base case
if(number == 0){
return 1;
}
return number*factorial(number -1);
}

(OR)

public static int factorial(int number){
int result = 1;
while(number != 0){
result = result*number;
number--;
}

return result;
}
}

Print Fibonacci Series

public static int fibonacci2(int number)
{
 if(number == 1 || number == 2)
{ return 1; }

 int fibo1=1, fibo2=1, fibonacci=1; 

for(int i= 3; i<= number; i++)
 fibonacci = fibo1 + fibo2;  //Fibonacci number is sum of previous two Fibonacci number 
 fibo1 = fibo2;
 fibo2 = fibonacci; 
}

 return fibonacci; //Fibonacci number 
}
}

(OR)

public static int fibonacci(int number)
{
 if(number == 1 || number == 2)
{ return 1; } 
return fibonacci(number-1) + fibonacci(number -2); //tail recursion 
}

Check if String Palindrome

We can check palindrome string by reversing string and checking whether it is equal to the original string or not.

checkIfPalindrome(String s)
{

StringBuilder s2 = new StringBuilder(s);
s2.reverse();

String rev_s2 = s2.toString();

if(s.equals(rev_s2))
{ return true; }
else
{ return false; }


}

(OR)

public class Palindrome {
public static void main(String[] args) {
String str = "OOLOO";
StringBuffer newStr =new StringBuffer();
for(int i = str.length()-1; i >= 0 ; i--) {
newStr = newStr.append(str.charAt(i));
}
if(str.equalsIgnoreCase(newStr.toString())) {
System.out.println("String is palindrome");
} else {
System.out.println("String is not palindrome");
}
}

}

Handler vs AsyncTask vs Thread

Handlers are background threads that provide you to communicate with the UI. Updating a progressbar for instance should be done via Handlers. Using Handlers you have the advantage of MessagingQueues, so if you want to schedule messages or update multiple UI elements or have repeating tasks.

AsyncTasks are similar, infact they make use of Handlers, but doesn't run in the UI thread, so its good for fetching data, for instance fetching webservices. Later you can interact with the UI.

Threads however can't interact with the UI, provide more "basic" threading and you miss all the abstractions of AsyncTasks. But ff you see the source code of AsyncTask and Handler, you will see their code purely in Java.

What does it mean ? It means no magic in AsyncTask or Handler. They just make your job easier as a developer. For example: If Program A calls method A(), method A() would run in a different thread with Program A.You can easily test by:

Thread t = Thread.currentThread();
int id = t.getId();

So, what is the difference ? AsyncTask and Handler are written in Java (internally use a Thread), so everything you can do with Handler or AsyncTask, you can achieve using a Thread too.

What Handler and AsyncTask really help you with? The most obvious reason is communication between caller thread and worker thread. (Caller Thread: A thread which calls the Worker Thread to perform some task.A Caller Thread may not be the UI Thread always). And, of course, you can communicate between two thread by other ways, but there are many disadvantages, for eg: Main thread isn't thread-safe (in most of time), in other words, DANGEROUS.

That is why you should use Handler and AsyncTask. They do most of the work for you, you just need to know what methods to override.

Difference Handler and AsyncTask:

Use AsyncTask when Caller thread is a UI Thread. This is what android document says:

AsyncTask enables proper and easy use of the UI thread. This class allows to perform background operations and publish results on the UI thread without having to manipulate threads and/or handlers.

I want to emphasize on two points:

1) Easy use of the UI thread (so, use when caller thread is UI Thread). 2) No need to manipulate handlers. (means: You can use Handler instead of AsyncTask, but AsyncTask is an easier option). There are many things in this post I haven't said yet, for example: what is UI Thread, of why it easier.

When you read Android document, you will see: Handler allows you to send and process Message and Runnable objects associated with a thread's MessageQueue

They may seem strange at first.Just understand that, each thread has each message queue. (like a Todo List), and thread will take each message and do it until message queue empties. So, when Handler communicates, it just gives a message to caller thread and it will wait to process. (Handler can communicate with caller thread in safe-way)

Codes

Toast:
Toast.makeText(getApplicationContext(), ((TextView) view).getText(),Toast.LENGTH_SHORT).show();
------------------------
Intents:
Intent intent = new Intent(MyActivity.this, MyOtherActivity.class);
startActivity(intent);
------------------------

Service

Most confusion about the Service class actually revolves around what it is not:

-A Service is not a separate process. The Service object itself does not imply it is running in its own process; unless otherwise specified, it runs in the same process as the application it is part of.
-A Service is not a thread. It is not a means itself to do work off of the main thread (to avoid Application Not Responding errors).

Thus a Service itself is actually very simple, providing two main features:
A facility for the application to tell the system about something it wants to be doing in the background (even when the user is not directly interacting with the application). This corresponds to calls to Context.startService(), which ask the system to schedule work for the service, to be run until the service or someone else explicitly stop it.
A facility for an application to expose some of its functionality to other applications. This corresponds to calls to Context.bindService(), which allows a long-standing connection to be made to the service in order to interact with it.

When a Service component is actually created, for either of these reasons, all that the system actually does is instantiate the component and call its onCreate() and any other appropriate callbacks on the main thread. It is up to the Service to implement these with the appropriate behavior, such as creating a secondary thread in which it does its work.

Service Lifecycle :
There are two reasons that a service can be run by the system.

If someone calls Context.startService() then the system will retrieve the service (creating it and calling its onCreate() method if needed) and then call its onStartCommand(Intent, int, int) method with the arguments supplied by the client. The service will at this point continue running until Context.stopService() or stopSelf() is called. Note that multiple calls to Context.startService() do not nest (though they do result in multiple corresponding calls to onStartCommand()), so no matter how many times it is started a service will be stopped once Context.stopService() or stopSelf() is called; however, services can use their stopSelf(int) method to ensure the service is not stopped until started intents have been processed.

For started services, there are two additional major modes of operation they can decide to run in, depending on the value they return from onStartCommand(): START_STICKY is used for services that are explicitly started and stopped as needed, while START_NOT_STICKY or START_REDELIVER_INTENT are used for services that should only remain running while processing any commands sent to them. See the linked documentation for more detail on the semantics.

Clients can also use Context.bindService() to obtain a persistent connection to a service. This likewise creates the service if it is not already running (calling onCreate() while doing so), but does not call onStartCommand(). The client will receive the IBinder object that the service returns from its onBind(Intent) method, allowing the client to then make calls back to the service. The service will remain running as long as the connection is established (whether or not the client retains a reference on the service's IBinder). Usually the IBinder returned is for a complex interface that has been written in aidl. A service can be both started and have connections bound to it. In such a case, the system will keep the service running as long as either it is started or there are one or more connections to it with the Context.BIND_AUTO_CREATE flag. Once neither of these situations hold, the service's onDestroy() method is called and the service is effectively terminated. All cleanup (stopping threads, unregistering receivers) should be complete upon returning from onDestroy().

Audio and Video

Android includes a comprehensive Media Player to simplify the playback of audio and video.

Multimedia playback in Android is handled by the MediaPlayer class. You can play media stored in application resources, local files, Content Providers, or streamed from a network URL. In each case,
the file format and type of multimedia being played is abstracted from you as a developer.

The Media Player’s management of audio and video files and streams is handled as a state machine. In the most simplistic terms, transitions through the state machine can be described as follows:
- Initialize the Media Player with media to play.
- Prepare the Media Player for playback.
- Start the playback
- Pause or stop the playback prior to its completing.
- Playback complete.

To play a media resource you need to create a new MediaPlayer instance, initialize it with a media
source, and prepare it for playback.

Initializing Audio Content for PlaybackTo play back audio content using the Media Player, you need to create a new Media Player object and set the data source of the audio in question.

To play back audio using the Media Player, you can use the static create method, passing in the application Context and one of the following:
- A resource identifier
- A URI to a local file using the file:// schema
- A URI to an online audio resource as a URL
- A URI to a local Content Provider row

Initializing audio content for playback
Context appContext = getApplicationContext();
MediaPlayer resourcePlayer = MediaPlayer.create(appContext,R.raw.my_audio);
MediaPlayer filePlayer = MediaPlayer.create(appContext,Uri.parse("file:///sdcard/localfile.mp3"));
MediaPlayer urlPlayer = MediaPlayer.create(appContext,Uri.parse("http://site.com/audio/audio.mp3"));
MediaPlayer contentPlayer = MediaPlayer.create(appContext,Settings.System.DEFAULT_RINGTONE_URI);

Alternatively, you can use the setDataSource method on an existing Media Player instance. This method accepts a file path, Content Provider URI, streaming media URL path, or File Descriptor.

When using the setDataSource method it is vital that you call prepare on the Media Player before you
begin playback.

Using setDataSource and prepare to initialize audio playback
MediaPlayer mediaPlayer = new MediaPlayer();
mediaPlayer.setDataSource("/sdcard/test.3gp");
mediaPlayer.prepare();

In each case, once you’ve finished playback, callrelease on your Media Player object to free the associated resources:
mediaPlayer.release();

Android supports a limited number of simultaneous Media Player objects; not releasing them can cause runtime exceptions when the system runs out of resources.

Preparing for Video Playback
Playback of video content is slightly more involved than audio. To show a video, you must specify a display surface on which to show it. The following sections describe two alternatives for the playback of video content.

The first, using the Video View control, encapsulates the creation of a display surface and allocation and preparation of video content within a Media Player. The second technique allows you to specify your own display surface and manipulate the underlying Media Player instance directly.

Playing Video Using the Video ViewThe simplest way to play back video is to use the VideoView control. The Video View includes a Surface on which the video is displayed and encapsulates and manages a Media Player to manage the video playback.

The Video View supports the playback of local or streaming video as supported by the Media Player
component. Video Views conveniently encapsulate the initialization of the Media Player. To assign a video to play simply call setVideoPath or setVideoUri to specify the path to a local file, or the URI of a ContentProvider or remote video stream:
streamingVideoView.setVideoUri("http://www.mysite.com/videos/myvideo.3gp");
localVideoView.setVideoPath("/sdcard/test2.3gp");

Once initialized, you can control playback using the start, stopPlayback, pause, and seekTo methods. The Video View also includes the setKeepScreenOn method to apply a screen Wake Lock that will prevent the screen from being dimmed while playback is in progress.

Video playback using a Video View
VideoView videoView = (VideoView)findViewById(R.id.surface);
videoView.setKeepScreenOn(true);
videoView.setVideoPath("/sdcard/test2.3gp");
if (videoView.canSeekForward())
videoView.seekTo(videoView.getDuration()/2);
videoView.start();
[ . . . do something . . . ]
videoView.stopPlayback();
 
Setting up a Surface for Video Playback
The first step to using the Media Player to view video content is to prepare a Surface onto which the
video will be displayed. TheMedia Player requires a SurfaceHolder object for displaying video content,
assigned using the setDisplay method.


Sample layout including a Surface View
<?xml version="1.0" encoding="utf-8"?>
<LinearLayout xmlns:android="http://schemas.android.com/apk/res/android"
android:orientation="vertical"
android:layout_width="fill_parent"
android:layout_height="fill_parent">
<SurfaceView
android:id="@+id/surface"
android:layout_width="wrap_content"
android:layout_height="wrap_content"
android:layout_gravity="center">
</SurfaceView>
</LinearLayout>
 

The Surface View is a wrapper around the Surface Holder object, which in turn is a wrapper around the Surface that is used to support visual updates from background threads.

Surface Holders are created asynchronously, so you must wait until the surfaceCreated handler has been fired before assigning the returned Surface Holder object to the Media Player.

Initializing and assigning a Surface View to a Media Player
public class MyActivity extends Activity implements SurfaceHolder.Callback
{
private MediaPlayer mediaPlayer;
@Override
public void onCreate(Bundle savedInstanceState) {
super.onCreate(savedInstanceState);
setContentView(R.layout.main);
mediaPlayer = new MediaPlayer();
SurfaceView surface = (SurfaceView)findViewById(R.id.surface);
SurfaceHolder holder = surface.getHolder();
holder.addCallback(this);
holder.setType(SurfaceHolder.SURFACE_TYPE_PUSH_BUFFERS);
holder.setFixedSize(400, 300);
}
public void surfaceCreated(SurfaceHolder holder) {
try {
mediaPlayer.setDisplay(holder);
} catch (IllegalArgumentException e) {
Log.d("MEDIA_PLAYER", e.getMessage());

} catch (IllegalStateException e) {
Log.d("MEDIA_PLAYER", e.getMessage());
} catch (IOException e) {
Log.d("MEDIA_PLAYER", e.getMessage());
}
}
public void surfaceDestroyed(SurfaceHolder holder) {
mediaPlayer.release();
}
public void surfaceChanged(SurfaceHolder holder,
int format, int width, int height) { }
}


Initializing Video Content for Playback
Once you have created and assigned the Surface Holder to your Media Player, use the setDataSource method to specify the path, URL, or Content Provider URI of the video resource to play.

As with audio playback, if you’re passing a URL to an online media file, the file must be capable of
progressive download using the RTSP or HTTP protocols.

Once you’ve selected your media source, callprepare to initialize the Media Player in preparation for
playback.

Initializing video for playback using the Media Player
public void surfaceCreated(SurfaceHolder holder) {
try {
mediaPlayer.setDisplay(holder);
mediaPlayer.setDataSource("/sdcard/test2.3gp");
mediaPlayer.prepare();
mediaPlayer.start();
} catch (IllegalArgumentException e) {
Log.d("MEDIA_PLAYER", e.getMessage());
} catch (IllegalStateException e) {
Log.d("MEDIA_PLAYER", e.getMessage());
} catch (IOException e) {
Log.d("MEDIA_PLAYER", e.getMessage());
}
}

Notification

Your applications can use Notifications to alert users without using an Activity. Notifications are handled by the Notification Manager, and currently have the ability to:
- Create new status bar icons
- Display additional information (and launch an Intent) in the extended status bar window
- Flash the lights/LEDs
- Vibrate the phone
- Sound audible alerts (ringtones, Media Store audio)


Using Notifications is the preferred way for invisible application components (Broadcast Receivers, Services, and inactive Activities) to alert users that events have occurred that may require attention. They are also used to indicate ongoing background Services — particularly Services that have been
set to foreground priority.

As a user interface metaphor, Notifications are particularly well suited to mobile devices. It’s likely that your users will have their phones with them at all times but quite unlikely that they will be paying attention to them, or your application, at any given time. Generally users will have several applications open in the background, and they won’t be paying attention to any of them.

In this environment it’s important that your applications be able to alert users when specific events occur that require their attention. Notifications can be persisted through insistent repetition, being marked ongoing, or simply by displaying an icon on the status bar. Status bar icons can be updated regularly or expanded to show additional information using the expanded status bar window

Permissions

Permissions are an application-level security mechanism that lets you restrict access to application components. Permissions are used to prevent malicious applications from corrupting data, gaining access to sensitive information, or making excessive (or unauthorized) use of hardware resources or external communication channels.

The native permission strings used by native Android Activities and Services can be found as static constants in the android.Manifest.permission class. To use permission-protected components, you need to add <uses-permission> tags to application manifests, specifying the permission string that each application requires.

When an application package is installed, the permissions requested in its manifest are analyzed and granted (or denied) by checks with trusted authorities and user feedback.

Declaring and Enforcing Permissions:
 <uses-permission
        android:name="android.permission.GET_ACCOUNTS" />
    <uses-permission
        android:name="android.permission.USE_CREDENTIALS" />
    <uses-permission
        android:name="android.permission.MANAGE_ACCOUNTS" />
    <uses-permission
        android:name="android.permission.AUTHENTICATE_ACCOUNTS" />
    <uses-permission
        android:name="android.permission.INTERNET" />
    <uses-permission
        android:name="android.permission.WRITE_SETTINGS" />
    <uses-permission
        android:name="android.permission.WRITE_SECURE_SETTINGS" />
    <uses-permission
        android:name="android.permission.READ_CONTACTS" />
    <uses-permission
        android:name="android.permission.WRITE_CONTACTS" />
    <uses-permission
        android:name="android.permission.READ_SYNC_STATS" />
    <uses-permission
        android:name="android.permission.READ_SYNC_SETTINGS" />
    <uses-permission
        android:name="android.permission.WRITE_SYNC_SETTINGS" />


To include permission requirements for your own application components, use the permission attribute in the application manifest. Permission constraints can be enforced throughout your application, most usefully at application interface boundaries, for example:- Activities Add a permission to limit the ability of other applications to launch an Activity.
- Broadcast Receivers Control which applications can send broadcast Intents to your Receiver.
- Content Providers Limit read access and write operations on Content Providers.
- Services Limit the ability of other applications to start, or bind to, a Service.

In each case, you can add a permission attribute to the application component in the manifest, specifying a required permission string to access each component

Content Providers let you set readPermission and writePermission attributes to offer a more granular
control over read/write access.